Are you searching an original way to wow your followers, to make them gaze at your content longer and thus increase your engagement rate? If yes, you should learn how to create GUFs for your Instagram account! If the vast majority of your Instagram posts are photos and not videos, GIFs will especially be a fresh breath for your entire feed! GIFs are lovely, attractive and so funny to watch! One simply can’t pass by without first fully digesting the message a GIF caries. So, InstaBF suggests incorporating original and unique GIFs created by yourself into your Instagram feed! How? Let this known Instagram and IGTV provider explain to you how to create GIFs.
Create GIFs with Photoshop
To add some excitement to your ordinary product shots, GIFs are a powerful tool. Before we start explaining how to create them, it’s important to remember that:
- GIFs are uploaded as videos with either .mov or .mp4 formats;
- it must last a minimum 3 seconds, otherwise, it won’t be uploaded to Gram.
When planning to create our own GIF, make sure the photoshoot and the entire editing process are smooth. The storyboard is to be a simple one like when you create a flatlay. Scheme a list of all the necessary props and make certain they are at hand.
The Equipment You’ll Need
For creating a marvelous GIF for your Instagram account, you needn’t have a fancy camera setup. You can do the job with your smartphone camera, just make sure it has a tripod to stabilize the shots.
So, here are the necessary tools:
- a smartphone or a camera/lens;
- tripod (for flatlay GIFs);
- computer with an Adobe Photoshop program;
- photoshoot props.
If you plan to make everything at a professional level, it will be great to also have an Adobe Lightroom, tethering cable so that you can shoot remotely right on your PC, and two pieces of white foam core that can brighten the scene by bouncing light.
Shooting GIFs
When shooting a GIF, the first rule is to make the first and last scene be absolutely the same. This way it the transitions will be seamless. Besides, it’s crucial to make sure not to touch and move any object you don’t want to be in motion in the GIF. Other movable props must be put aside, to be used whenever necessary. Then configure the camera or your phone. If you use the latter, check out if the AF lock is on. This way both the lighting and focus will be identical throughout all the shots.
Now, when everything is ready, pass to the shooting process. Come up to the storyboard without bumping anything around. Shoot all the frames in the order you’d like them to appear in. This will make the editing process much easier. Once you are sure all the necessary shots are taken, pass to the technical fun in Photoshop.
Editing GIFs with Adobe Photoshop
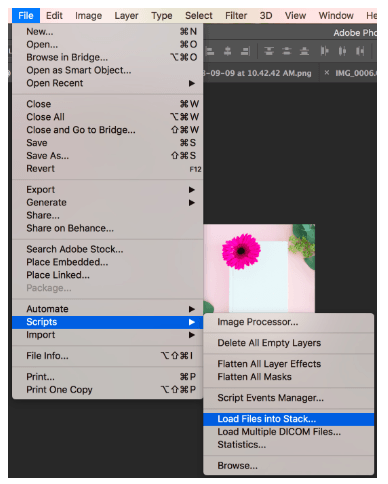
Now, when you have uploaded all your shots to your PC, create a file in Photoshop and load the photos into it. For this, follow this guideline – File, Scripts, Load Files Into New Stack.
Then browse and pick up the photos you want to create a GIF with. Tap Windows and then Timeline. Right in the timeline center, you will find a drop-down menu. Tap the button with “Create Frame Animation”. After this, you can see the first GIF layer on the lowest left-handed corner. The same operation must be repeated until you have created all the layers you intended (use the “new frame” button in the right low part of the screen).
Once all this is done, get to the Layers panel and regular the order of the images to appear in. To fulfill this, choose all frames, then tap the button of each frame to regulate the speed. By the way, the best speed for Instagram is .30.
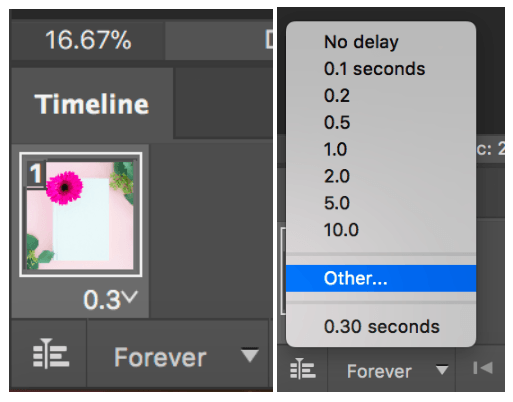
Besides, watch the GIF to be looped for “forever”.
There is always an option to make a reversible GIF. For this, choose the middle part of the GIF, paste new frames, get to the toolbar again and pick up “Reverse Frames”.
After all these manipulations, you can check how your new GIF looks! Make sure it’s more than 3 seconds to post on Gram. Besides, pass to Image, them Image Size, and choose 2000 x 2000 pixel number. The pas to the File, then Export and Render Video. Pick up the necessary folder and crop the video with Photoshop if it’s larger than the necessary “Document size”. Voila! Your own GIF is ready to present to your dear followers’ judgment!